


House Control
Your home as a live 3D model — in the Mac's menu bar, around its notch and on your iPhone —
controlling its lights and air conditioners through Smart Life, Home Assistant, Philips Hue and Apple Home.
Download · Build it yourself · Support the project

What it does
- Lives in the menu bar. Click the house icon and a panel drops down; click anywhere else and it is gone.
- Your floor plan in 3D. Rooms, walls, doors, windows and furniture are built from one JSON file. Lamps light the scene the way they light the room; an AC that is running blows visible air.
- Lights. Tap to toggle, drag across a tile to dim, open a light for brightness, white temperature and colour.
- Air conditioners. Power, target temperature, mode and fan speed, with the room temperature from a real sensor if you have one.
- Scenes. One tap sets every light and AC — "Cozy", "Movie", "Night", or your own.
- A visual editor. Draw the rooms, drop in furniture, place lamps and ACs, and link each one to a real device.
- Your devices, wherever they live. Smart Life / Tuya, Home Assistant (and the thousands of brands it runs), Philips Hue and Apple Home — mixed freely in one home. See Connect real devices.
- An island around the notch. Rest the pointer on the MacBook's notch and a small live model of the home drops out of it, with scenes and every device one click away. See The island.
- AI Access. Give ChatGPT, Claude or any AI assistant a private link — or connect it over MCP — and it runs your lights and air conditioners, and rebuilds rooms in the 3D model from your photos. Served by your Mac; Stop ends it. See AI Access.
- An iPhone app. The same home in your pocket, kept in sync with the Mac over your own Wi-Fi. See iPhone app.
- Works without any hardware. Until you sign in, every device is simulated, so you can try everything first.
Both apps are a small native Swift shell (AppKit on the Mac, SwiftUI on the iPhone) around one Three.js web UI, and share their device clients and sync as a Swift package. No frameworks, no Electron, no server, no account of its own.
Download
- Get
HouseControl-<version>.dmgfrom Releases. It runs on macOS 13 or newer, Apple silicon and Intel. - Open it and drag House Control into Applications.
- Open House Control from Applications. The first time, macOS stops it with “Apple could not verify…”,
because the app is not signed with a paid Apple Developer ID (see why).
Allow it once:
- macOS 15 Sequoia and newer: click Done, open System Settings → Privacy & Security, scroll down to “House Control was blocked…”, click Open Anyway and confirm with your password.
- macOS 13–14: Control-click the app in Applications, choose Open, then Open again.
- Or, in Terminal:
xattr -dr com.apple.quarantine "/Applications/House Control.app"
- Look for the house in the menu bar — there is no Dock icon and no window. Click it.
It starts with a bundled demo plan, so you can try everything before connecting anything. Then: make it your home and connect real devices. To start it with your Mac, add it under System Settings → General → Login Items.
Check what you downloaded
Every release image is built by GitHub Actions from the tagged commit — not on anyone's Mac — and comes with its SHA-256 and a signed build provenance attestation:
shasum -a 256 -c HouseControl-<version>.dmg.sha256
gh attestation verify HouseControl-<version>.dmg --repo 0xProbabillity/house-control
The second command proves the image was built by this repository's workflow, and shows from which commit.
Why the app is not notarized
Notarizing needs an Apple Developer ID, and that certificate carries a person's legal name inside every copy of the app. House Control ships signed ad hoc instead, and earns trust the open-source way: the code is all here, the release is built in public, and you can build it yourself in a couple of minutes.
Remove it
Quit it (right-click the menu bar icon → Quit), delete House Control from Applications and, to remove your
plan and connections too, ~/Library/Application Support/HouseControl/.
Requirements
| macOS | 13 Ventura or newer |
| Xcode Command Line Tools | Swift 5.9 or newer — xcode-select --install |
| Node.js | 20.19+ or 22.12+ |
| For the iPhone app | Xcode 16 or newer, XcodeGen (brew install xcodegen), iOS 17+ |
Build and run
git clone https://github.com/0xProbabillity/house-control.git
cd house-control
./scripts/build-app.sh
open build/HouseControl.app
The script builds the web UI with Vite, the native shell with SwiftPM, and assembles an ad-hoc signed
build/HouseControl.app. The first build downloads the npm packages; later builds take a few seconds.
The app is signed ad hoc. If you rebuild often and use iPhone sync, sign it with your own certificate instead, so
macOS does not ask for the Local Network permission after every build:
CODESIGN_IDENTITY="Apple Development: you@example.com (ABCDE12345)" ./scripts/build-app.sh.
To keep it, drag build/HouseControl.app into /Applications. To start it with your Mac, add it under
System Settings → General → Login Items.
There is no Dock icon and no main window: look for the house in the menu bar.
Using it
| Do this | To get this |
|---|---|
| Click the menu bar icon | Open or close the panel |
| Right-click the menu bar icon | Edit Home, Load Floor Plan, Reveal Plan File, Reveal Device Log, Show Island, Pair iPhone, AI Access, Reload, Quit |
| Click a lamp in the 3D view, or its tile | Toggle it |
| Drag sideways across a light tile | Dim it |
| Click the sliders icon on a light tile | Brightness, white temperature, colour |
| Click an AC, or its tile | Open its sheet: temperature, mode, fan speed |
| Click a room | Zoom in on it and list only its devices |
| Drag the 3D view / scroll over it | Rotate / zoom |
Esc |
Back, then close |
The menu bar icon shows how many lights are on and the target of the running AC, for example 6 · 23°.
The gear button in the panel switches between your home and the two bundled demo plans, Apartment and Studio.
The island
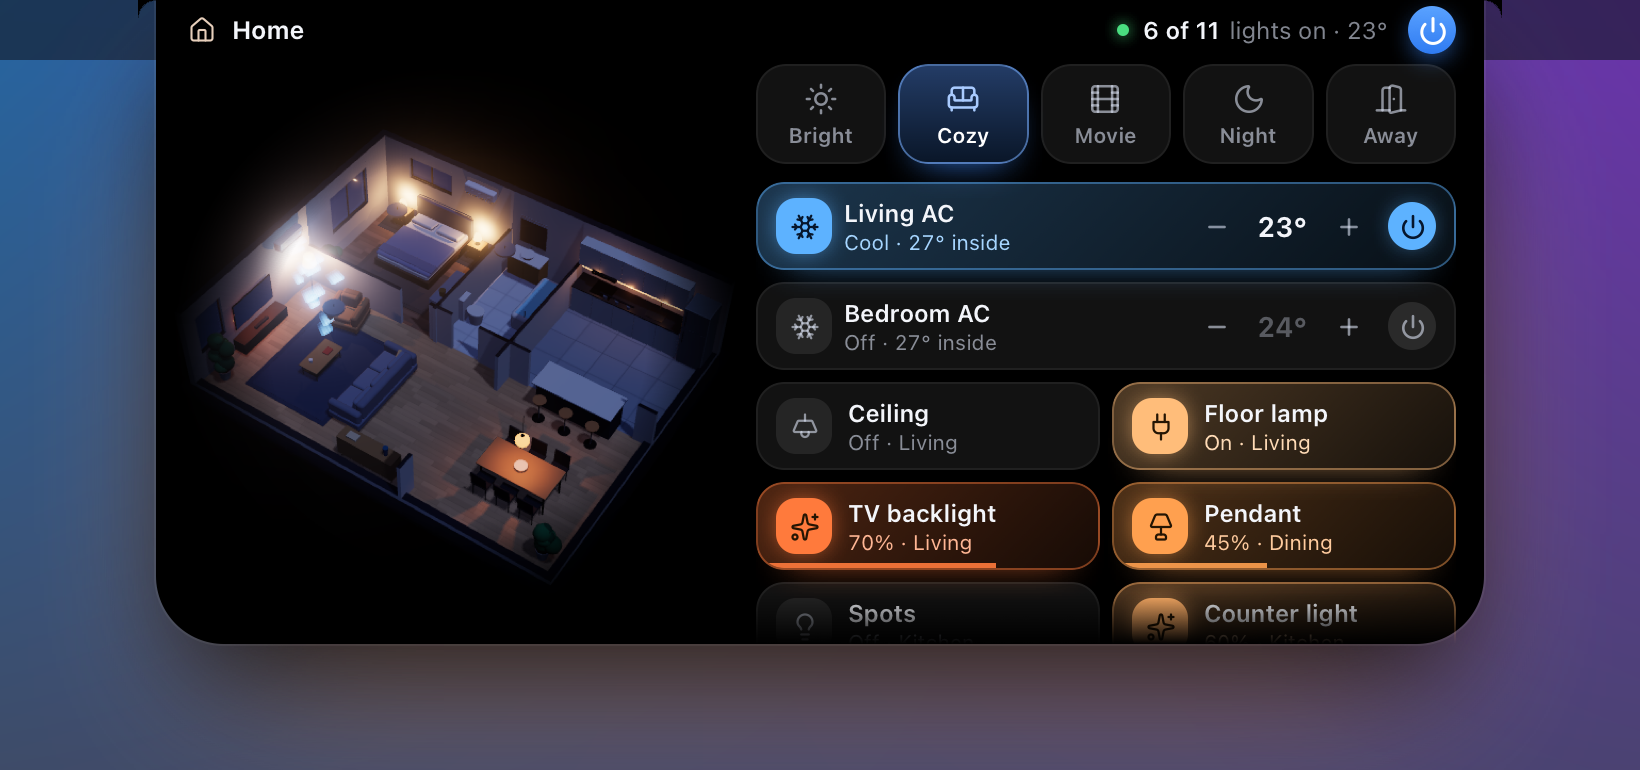
A black tab grows out of the MacBook's notch. On a display without a notch it is drawn in the middle of the menu bar.
| Do this | To get this |
|---|---|
| Look at it | How many lights are on, and the target of a running AC |
| Rest the pointer on it | It springs open: the 3D model, scenes, air conditioners and lights |
| Click a lamp in the model, or its chip | Toggle it; drag across a chip to dim |
| Click a room in the model | Zoom in on it |
| Move the pointer away | It closes |
When something changes elsewhere — a scene picked in the panel, a lamp switched from the phone — the island peeks out for a moment to say what happened. It never takes the keyboard from the app you are working in. Show Island in the menu bar icon's right-click menu turns it off.
AI Access

Right-click the menu bar icon → AI Access… → Start AI Access, and hand the private link to an assistant:
- Any chat: paste it into ChatGPT, Claude, Gemini or Perplexity with your request — "dim the living room to 30%". The link opens a guide written for AI assistants, with an action link for everything it can do.
- Connectors: add the MCP address as a custom connector in Claude or ChatGPT (or
claude mcp addin Claude Code) and the assistant can also change the home itself: "here are photos of my living room — rebuild it in 3D". - Your own agents: the same tools as plain HTTP + JSON, with an OpenAPI description.
The Mac serves it all: House Control listens on 127.0.0.1 only and is reached through a Cloudflare quick tunnel that
exists while AI Access is on (or not at all, with This Mac only). The link carries a 128-bit key, you choose what an
assistant may do, every request shows up live in the window, plan edits can be undone, and Stop — or the
auto-stop timer — makes the address disappear. Device IDs and sign-ins never leave the Mac.
Details, every tool, and the privacy model: docs/ai-access.md.
iPhone app
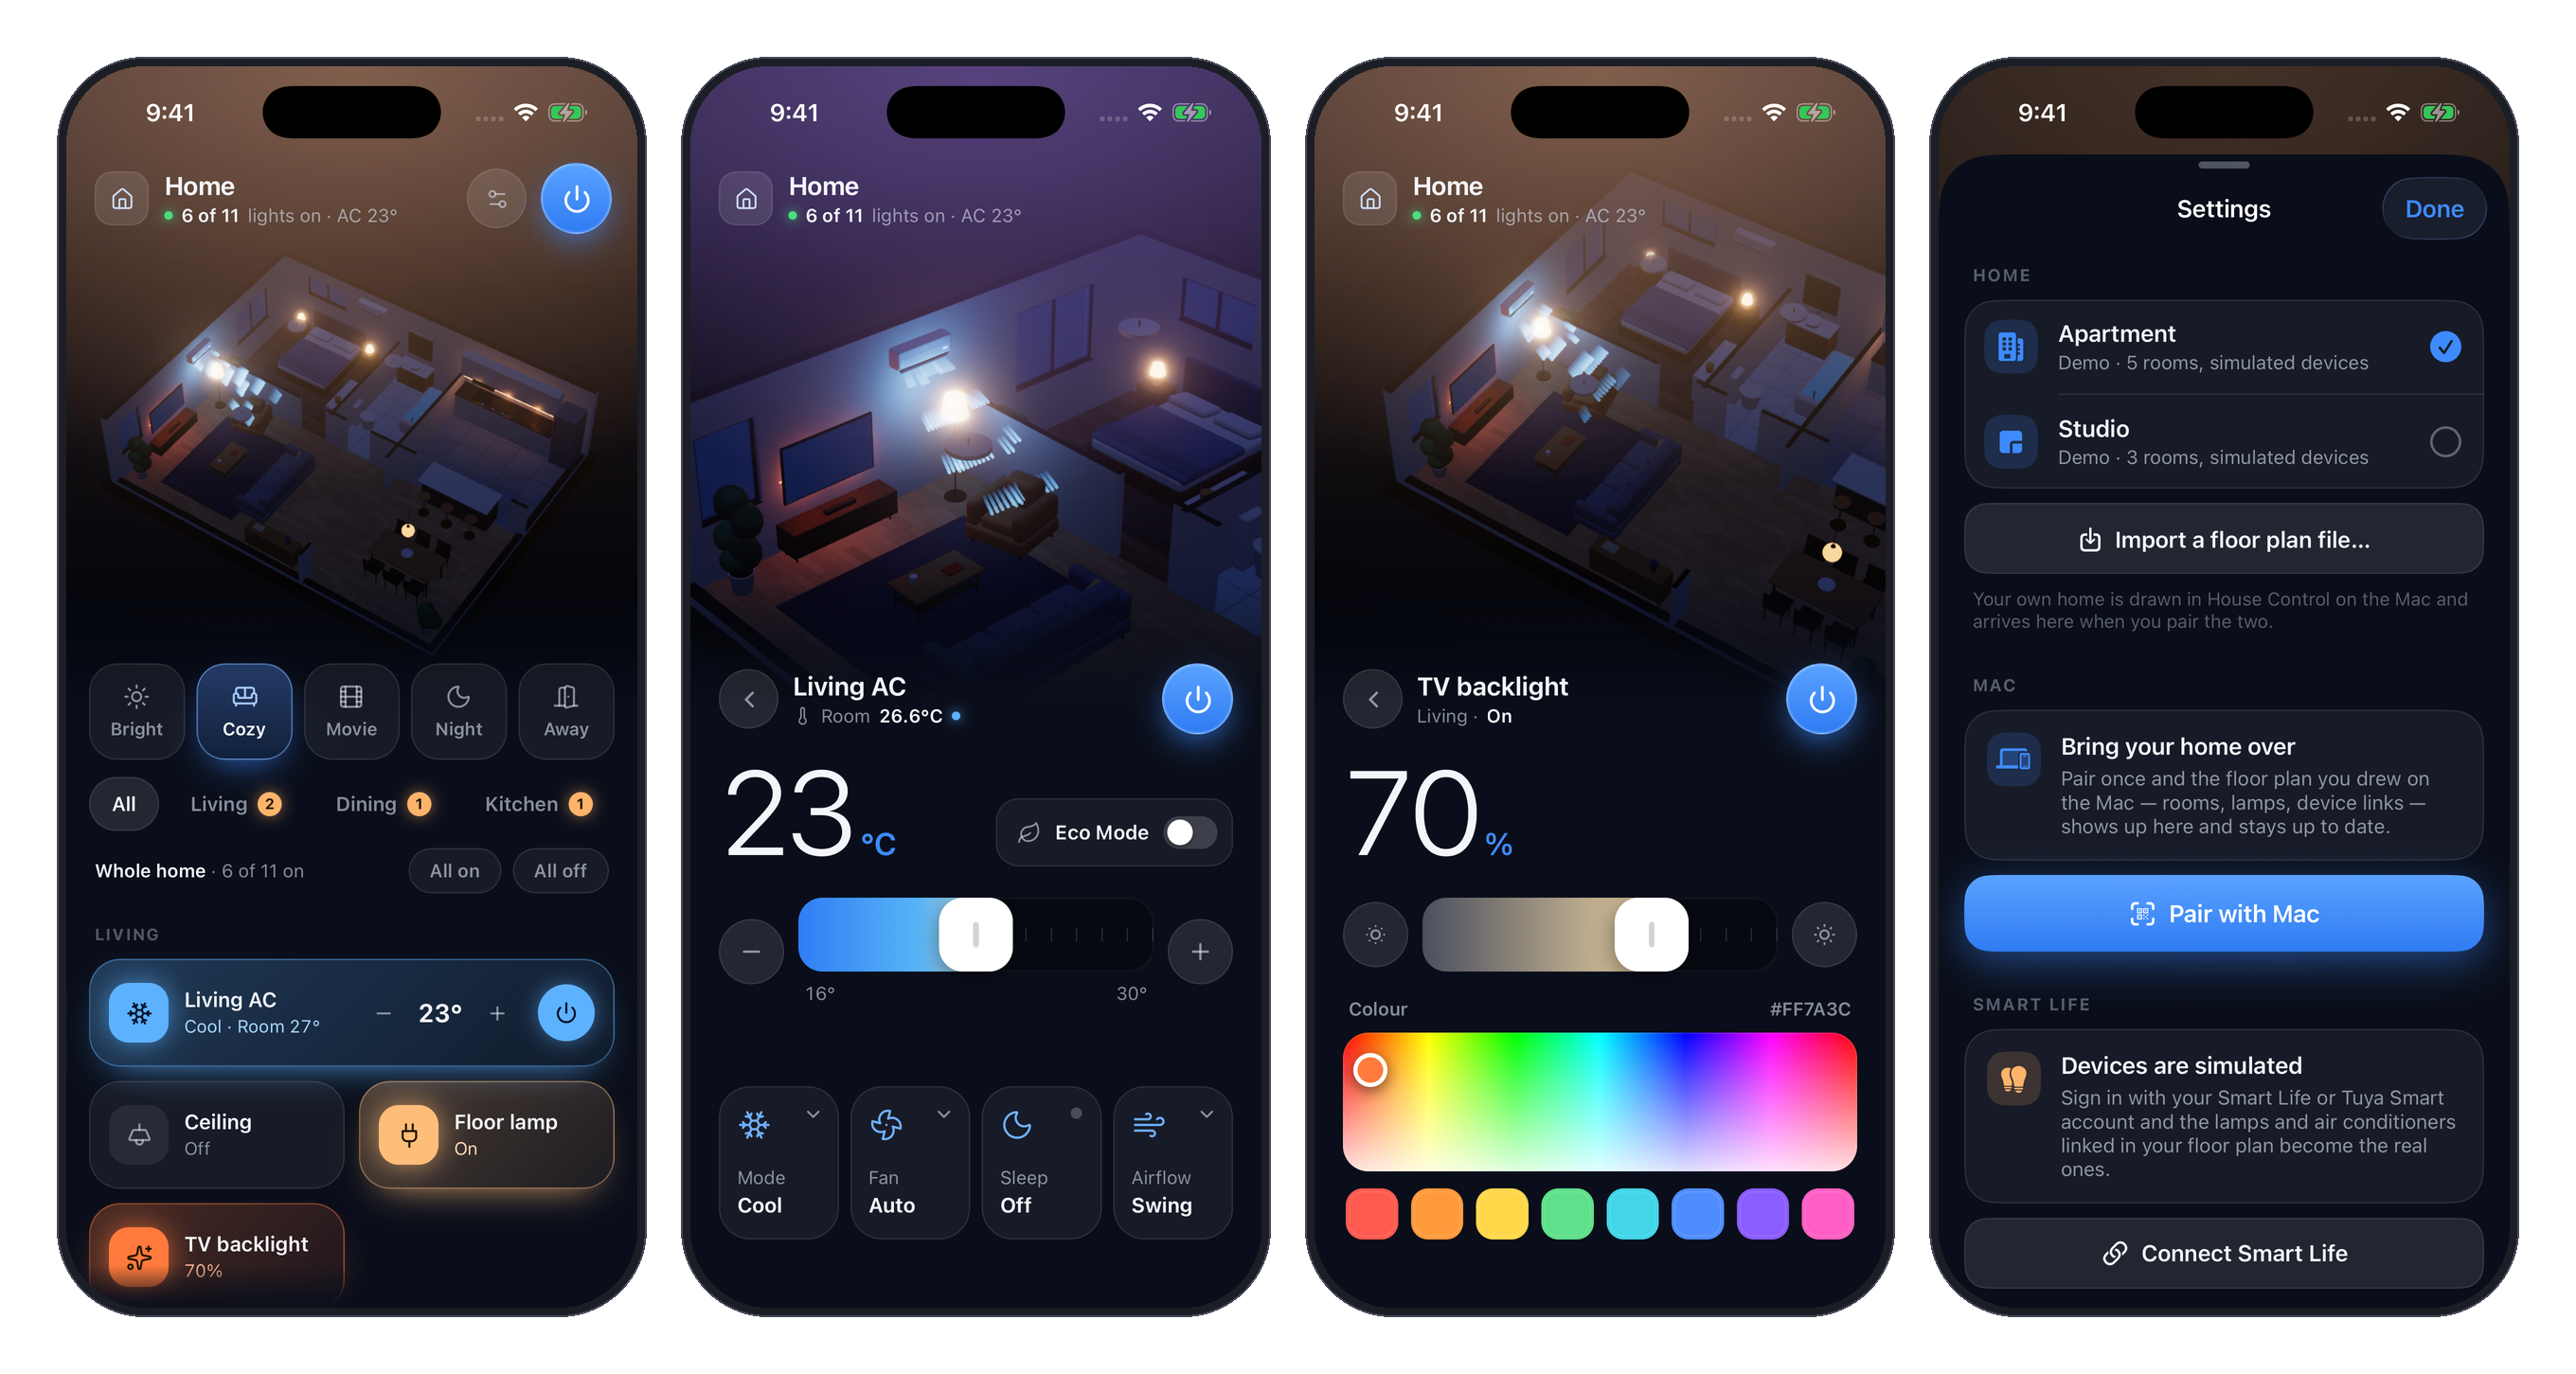
The iPhone app is the panel made for a thumb: tap a lamp in the 3D view or its tile, drag across a tile to dim, touch and hold a light for brightness and colour, pinch the model to zoom, swipe in from the left edge to go back.
Try it in the simulator:
./scripts/ios-sim.sh
To put it on a phone, write your Apple developer team into ios/Config/Local.xcconfig
(DEVELOPMENT_TEAM = ABCDE12345), run cd ios && xcodegen generate, open ios/HouseControl.xcodeproj and run it
on your device. ./scripts/build-ios.sh --upload archives it and sends it to TestFlight; the script lists what it needs.
Sync with the Mac
Your floor plan — rooms, furniture, lamps, scenes and the links to real devices — is drawn on the Mac and travels to the phone by itself.
- On the Mac: right-click the menu bar icon → Pair iPhone…. A QR code appears. macOS asks once whether House Control may find devices on your local network: allow it.
- On the iPhone: Settings (the sliders button) → Pair with Mac, and point the camera at the code. Or press Copy Pairing Link on the Mac and paste it on the phone.
From then on, whenever both are on the same Wi-Fi and the app is open, the phone has what the Mac has: Save & apply in the editor updates the phone a moment later.
Nothing goes through a server. The Mac advertises itself with Bonjour and the two talk over TLS with a pre-shared key that only the QR code carries, so a device that never saw the code cannot connect. Reset Pairing… in the pairing window issues a new key.
Real devices on the iPhone
The phone signs in to Smart Life on its own: Settings → Connect Smart Life. The User Code is filled in from the Mac if you are signed in there. The sign-in code has to be scanned by the Smart Life app, which is on the very phone you are holding — so the paired Mac puts the code on its screen for you. Without a Mac, share the code to any other screen.
The session is kept in the iPhone's Keychain and never leaves the device.
Make it your home
Right-click the icon and choose Edit Home…

- Drag rooms to move them and drag a corner to resize; everything snaps to 5 cm.
- Where two rooms touch, the wall between them appears by itself. Walls facing the camera are cut away.
- Add doors, windows, furniture, lamps and air conditioners from the list on the left.
- Save & apply writes the plan and reloads the panel.
The plan is a single JSON file, ~/Library/Application Support/HouseControl/plan.json. You can write it by hand,
export it, or import someone else's: see docs/floor-plan.md for every field.
The demo plans in web/public/plans are good starting points.
Connect real devices
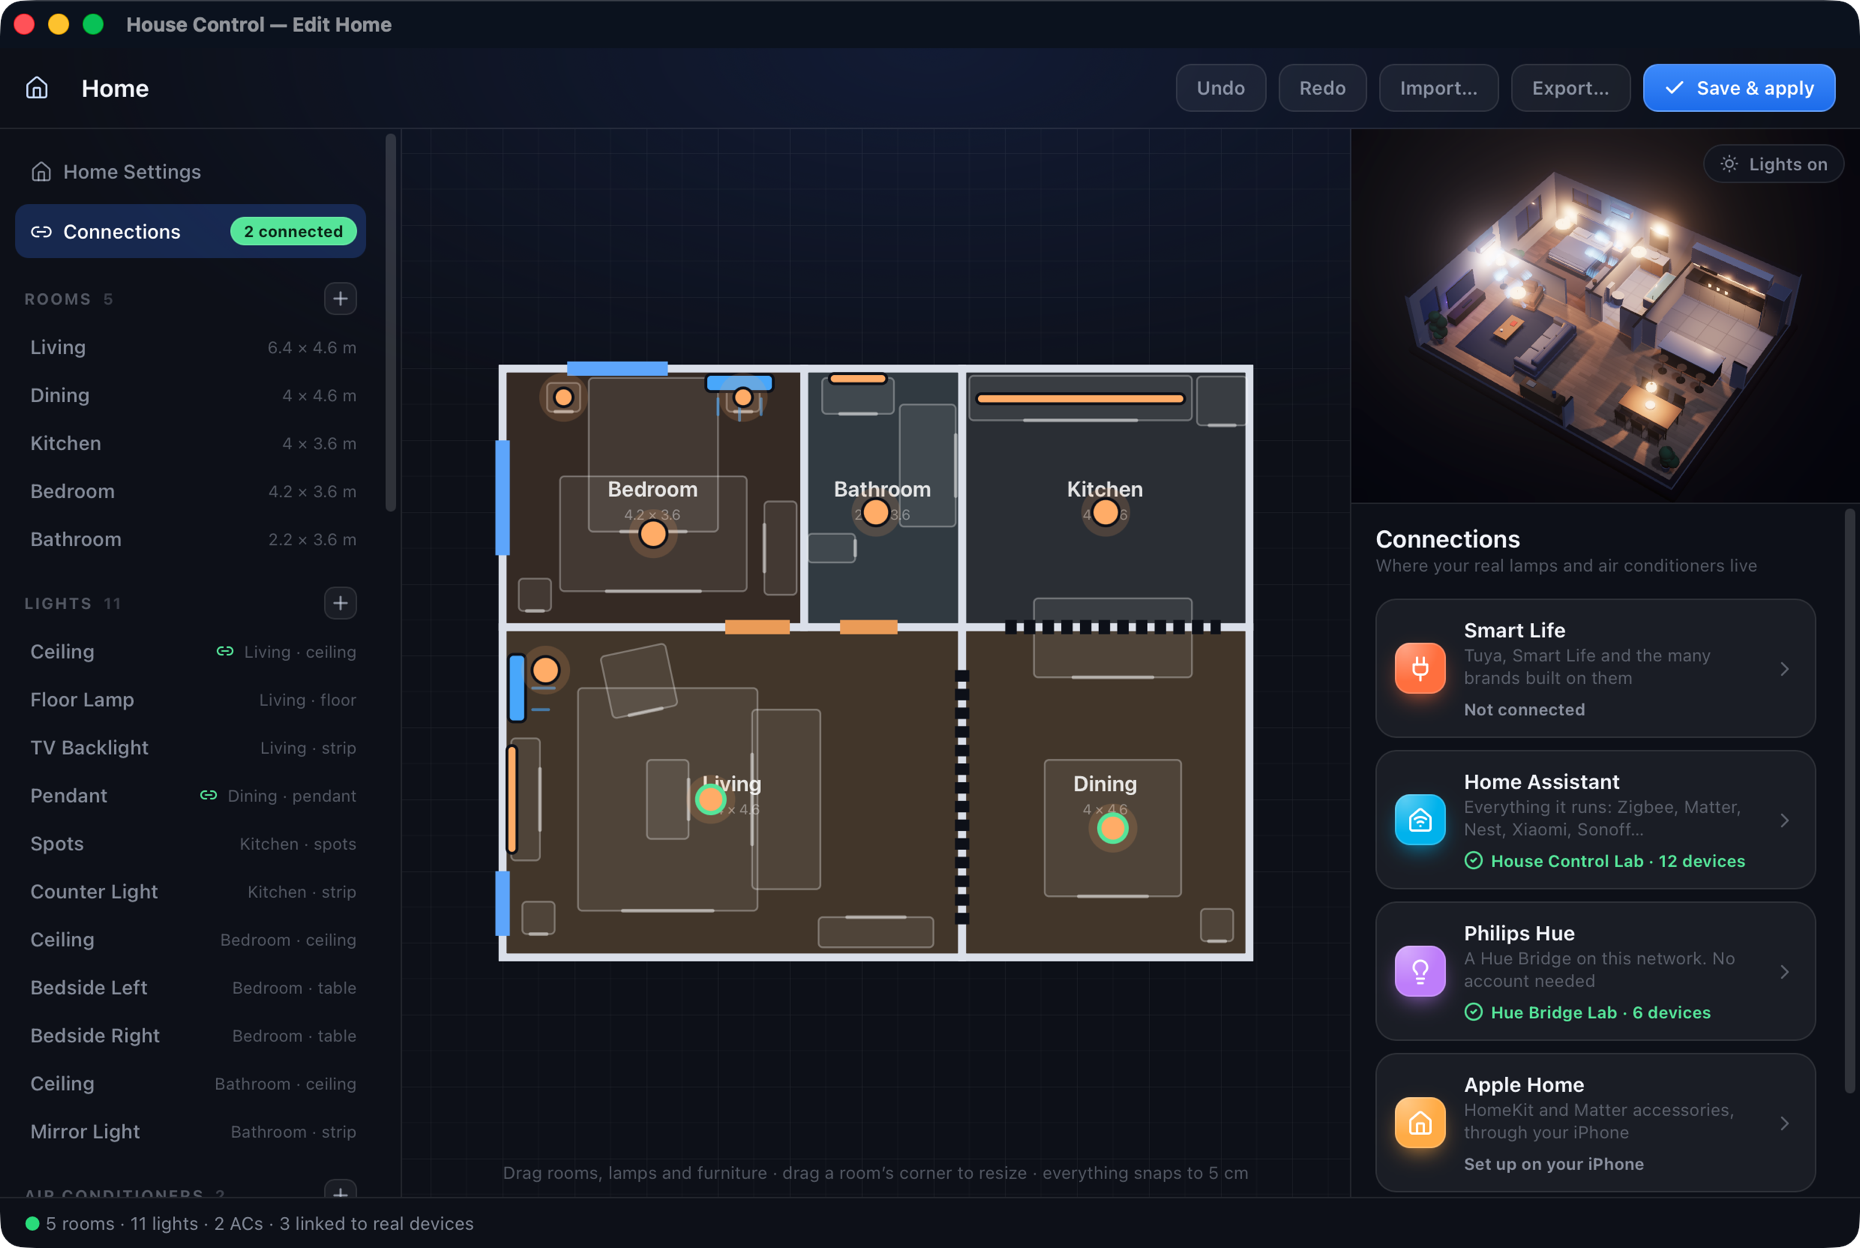
Right-click the icon → Edit Home… → Connections, and connect what you have:
| Platform | How | Details |
|---|---|---|
| Smart Life / Tuya | Scan a QR code with the Smart Life app. No Tuya developer account | docs/smart-life.md |
| Home Assistant | Found on your network by itself; paste a long-lived access token | docs/connections.md |
| Philips Hue | Found on your network by itself; press the button on the bridge | docs/connections.md |
| Apple Home | Allow access on your iPhone; its devices are listed on the Mac for linking | docs/connections.md |
Then select a lamp or an AC on the plan, choose its device under Real device (lamps take over what the device can do), and press Save & apply. From then on the panel controls the real device. Changes made elsewhere show up at once from Home Assistant and Hue, and within 12 seconds from Smart Life.
Your iPhone receives the Home Assistant and Hue connections from the Mac with the floor plan, and switches
Apple Home devices itself. Why there is no Google Home or Alexa yet, and how to get Tuya devices into Apple Home:
docs/connections.md. No hardware at hand? tools/lab has pretend
versions of Home Assistant, a Hue Bridge and a HomeKit bridge.
Privacy
House Control talks to the platforms you connect — Tuya's servers for Smart Life, your own Home Assistant, your Hue Bridge, Apple Home on the iPhone — and to nothing else. There is no telemetry and no backend of its own. The one exception is yours to switch on: AI Access opens a Cloudflare tunnel to your Mac while it is on.
Everything personal stays in ~/Library/Application Support/HouseControl/ on your Mac:
| File | Contents |
|---|---|
plan.json |
Your floor plan, including the IDs of the devices you linked |
settings.json |
Which plan is active |
smartlife.json |
The Smart Life session tokens. Readable only by you (mode 600) |
tuya.json |
Tuya Cloud project credentials, only if you use that option. Mode 600 |
homeassistant.json |
Your Home Assistant's address and access token. Mode 600 |
hue.json |
Your Hue Bridge's address, the key it issued and its certificate's fingerprint. Mode 600 |
homekit-devices.json |
The Apple Home devices your iPhone listed for the editor: names and ids |
events.log |
Commands sent to real devices and the cloud's answers. No tokens |
sync.json |
The key your paired iPhones use. Only there once you paired one. Mode 600 |
cloudflared.yml, bin/cloudflared |
An empty config for AI Access's tunnel, and Cloudflare's connector if you let the app download it |
None of these are part of this repository, and the build does not embed them in the app.
Sign out in the editor deletes smartlife.json. Deleting the folder resets the app to the demo plan.
On the iPhone the floor plan lives in the app's own folder, and the Smart Life session, the pairing key and the Home Assistant and Hue connections the Mac shared in the Keychain.
Development
web/      the UI: Three.js scene, panel, island, editor, AI Access window and the AI tools (Vite, plain ES modules)
core/     what both apps share: Smart Life and Tuya clients, plan store, Mac ⇄ iPhone sync, the AI gateway (SwiftPM, with tests)
macos/    the Mac shell: menu bar item, panel, island and editor windows (SwiftPM)
ios/      the iPhone shell: SwiftUI, generated into an Xcode project by XcodeGen
scripts/  build-app.sh, build-ios.sh and ios-sim.sh build the apps, release-mac.sh makes the .dmg,
          make-icon.swift and make-dmg-background.swift draw the icon and the disk image's window
tools/lab pretend Home Assistant, Hue Bridge and HomeKit bridge for testing without hardware
docs/     floor plan reference, connection guides, screenshots
The shared package has unit tests, including the sync over a real TLS connection:
cd core && swift test
Work on the UI in a browser with hot reload — the native bridge is a no-op there and all devices are simulated:
cd web
npm install
npm run dev
Then open http://localhost:5199/. Add ?plan=studio for the second demo plan, ?mode=editor for the editor,
?mode=island for the island, ?mode=agent for the AI Access window (with a simulated link), ?platform=ios for the iPhone layout, or ?device=living.ac to start on a
device's sheet. Set PORT to use another port.
Environment variables understood by the app:
| Variable | Effect |
|---|---|
HOUSE_DEV_URL=http://localhost:5199/ |
Load the UI from the dev server instead of the bundle |
HOUSE_WEB_DIR=/path/to/dist |
Load the UI from another folder |
HOUSE_DATA_DIR=/some/folder |
Keep plan, session and log there instead of Application Support, and do not persist panel state. Handy for a clean test run |
HOUSE_OPEN_ON_LAUNCH=1 |
Open the panel at launch |
HOUSE_OPEN_EDITOR=1 |
Open the editor at launch (connections, smartlife, homeassistant, hue or homekit opens it on that screen) |
HOUSE_OPEN_DEVICE=<id> |
Start the panel on that light's or AC's sheet |
HOUSE_PIN=1 |
Keep the panel open when it loses focus |
HOUSE_DOCK=1 |
Show a Dock icon, so UI automation tools can see the app |
HOUSE_ISLAND=0 |
Run without the island (1 forces it on) |
HOUSE_ISLAND_EXPANDED=1 |
Keep the island open |
HOUSE_OPEN_PAIRING=1 |
Open the Pair iPhone window at launch |
HOUSE_COMPUTER_NAME="Studio Mac" |
The name paired iPhones see, instead of the Mac's own (screenshots) |
HOUSE_SNAPSHOT_DIR=/some/folder |
Write panel.png and island.png there a few seconds after launch |
HOUSE_RENDER_HIDDEN=1 |
Keep drawing while the screen is locked, for unattended captures |
HOUSE_OPEN_AGENT=1 |
Open the AI Access window at launch (start also starts the link) |
HOUSE_AGENT_REACH=local |
Serve AI Access on this Mac only for one run (internet for the tunnel) |
HOUSE_AGENT_LINK_FILE=/some/file |
Write the live AI Access link there, for scripted tests |
HOUSE_EVAL_DIR=/some/folder |
Scripted UI checks: a panel.js / editor.js / island.js dropped there runs in that page (as an async function body) and its result is written to <mode>.json |
The iPhone app understands HOUSE_DATA_DIR, HOUSE_OPEN_DEVICE and HOUSE_SCREEN=home|settings|connections|pairing|smartlife|welcome;
scripts/ios-sim.sh passes any HOUSE_* variable on to the simulator.
For example, a throw-away instance on the demo plan, pinned open:
HOUSE_DATA_DIR=/tmp/house-demo HOUSE_PIN=1 HOUSE_OPEN_ON_LAUNCH=1 build/HouseControl.app/Contents/MacOS/HouseControl
The binary has a few offline self-checks and one read-only diagnostic:
| Command | Prints |
|---|---|
HouseControl --selftest-mapper |
The Tuya commands built for typical light and AC actions |
HouseControl --selftest-infrared |
The key presses sent to an infrared AC, against a simulated cloud remote |
HouseControl --selftest-transport |
The Smart Life request envelope for fixed inputs, to compare with the reference SDK |
HouseControl --diagnose <device id>… |
What Smart Life reports for those devices. Reads only; sends nothing |
Releasing the Mac app
Set MARKETING_VERSION in ios/Config/Base.xcconfig, commit, then tag and push:
git tag v0.1.0 && git push origin v0.1.0release.yml builds the universal app on a GitHub macOS runner
(UNSIGNED=1 ./scripts/release-mac.sh), attests its provenance and opens a draft release with the disk image
and its SHA-256. Check it, then publish the draft. Running the workflow by hand from the Actions tab builds the same
image as a downloadable artifact without a release.
With an Apple Developer ID of your own, ASC_KEY_ID=… ASC_ISSUER_ID=… ./scripts/release-mac.sh --publish builds a
signed and notarized image locally instead; the script lists what it needs.
Limitations
- The iPhone app is not on the App Store (it is on TestFlight for the author's testers).
- The floor plan is edited on the Mac only. The iPhone receives it, and only while both are on the same network.
- Rooms are axis-aligned rectangles. An L-shaped room is two rooms.
- Apple Home devices are switched by the iPhone app only: macOS gives HomeKit to App Store apps only.
- Smart Life devices are reached through Tuya's cloud, not over the local network, so they need an internet connection (Home Assistant and Hue work on your network alone).
- Infrared air conditioners are one-way: the app shows what was last sent, not what the unit is doing.
Support the project
House Control is free and has no ads. If it earned a place in your menu bar, a tip in crypto helps it keep growing: more devices, more platforms, quicker fixes. Thank you! A star, a bug report or a pull request helps just as much.
Scan a code with your wallet, or copy an address with the button in the corner of its box.
Important
Send each coin only over the network named next to its address. Coins sent over another network may be lost.

|
 Bitcoin
BTC · native SegWit (bech32) address |

|


 Ethereum · Base · BNB Chain · Arbitrum
One address on all four networks · ETH, BNB, USDT, USDC and other tokens |

|
 TON
TON
Toncoin and USDT on TON · no memo needed |

|
 TRON
TRON
TRX and USDT (TRC-20) |
Acknowledgements and disclaimer
The Smart Life sign-in is a Swift port of Tuya's open-source
tuya-device-sharing-sdk, the library behind the Tuya
integration in Home Assistant, and identifies itself to Tuya the same way. The 3D view is built with
Three.js; the icons are from Lucide, the network logos under
Support the project from Web3 Icons (MIT).
This project is not affiliated with or endorsed by Tuya, Smart Life or Home Assistant. It relies on an interface Tuya can change at any time. Use it at your own risk.